
Saturday, 30 January 2016


Friday, 29 January 2016


Wednesday, 27 January 2016
What is junk files and How to delete junk files?

Junk files are something that
every computer expert recommends to delete on a regular basis.
How junk files created?
Every time you use your
computer, different files are created. When you open a document, It creates
temporary files that help things run smoothly and automatically back up your
work.
When you browse the Internet,
your browser downloads temporary Internet files that get pre-loaded whenever
you visit the same websites again to make load faster. Even when you power on
or shut down your computer, Windows creates temporary system files. All these
files are useful, but the problem is that they don't get deleted automatically
when they are no longer needed by your system or your software. That's how
temporary files become junk files.
Why junk files should be deleted?
Junk files sound pretty
harmless, but unfortunately that's not the case. If you have too many junk
files stored on your computer, they will start sorts of problems. The main
problem is that they take up a lot of disk space. If you've never done junk
files cleanup, then we are talking about gigabytes of wasted space. And even if
you run disk cleanup occasionally or have a relatively new computer, you may
still have one or two gigabytes of junk. So, if you start running out of space
and especially if you have an SSD, you should run disk cleanup regularly.
Another reason is they make
your computer slow. The more outdated temporary files you have, the more time
your system needs to find your documents, open programs, launch web pages and
so on. And if there are too many junk files on your disk, your computer can get
really slow on startup. Deleting junk files not free up valuable disk space,
but it will also make your computer faster.
How to delete junk files?
The best way to delete junk
files is to use a disk cleanup utility that will find them all and let you
delete them in just one mouse click. Windows has a built-in disk cleaner that
you can use for basic file cleanup. But if you are looking for something more
advanced or something that will delete junk files automatically in the
background, try FileCleaner. It's fast, easy to use and very effective.
Now you know what are junk files and why you
should delete them. Run disk cleanup regularly and your computer will stay
fast.
Sunday, 24 January 2016

Sunday, 17 January 2016
How to Remove a Program Completely by Modifying the Registry (Windows)
Remove Completely Program from System
Deleting a program from your computer, may leave remnant links in your files. In order to make sure the program is completely deleted, just perform the following steps.There is few steps to remove completely program by modifying the registry as follows:
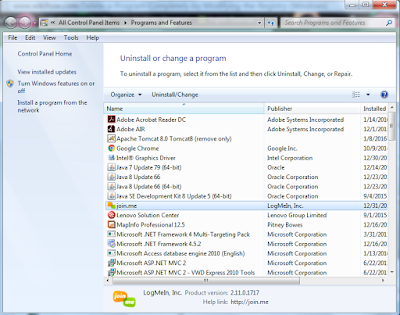
Step 1: Open Control Panel -> Programs and Features to Uninstall or change a program.
Step 2: Now select program you want to uninstall program as define in image.

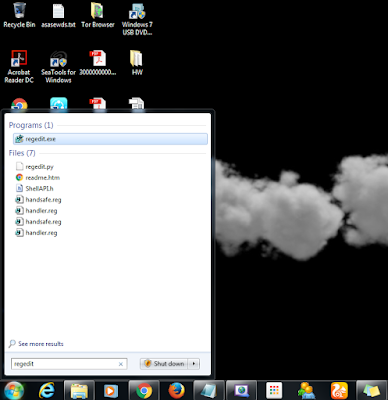
Step 3: Now goto Start Menu and GO TO Regedit.exe.
Step 4: Now GOTO File.


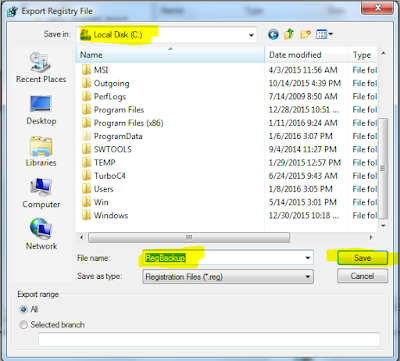
Step 5: Now Export Regestry Editor file.

Step 6: Save file as REGBACKUP in C Drive(C:\).

Step 7: Now goto Save this file.
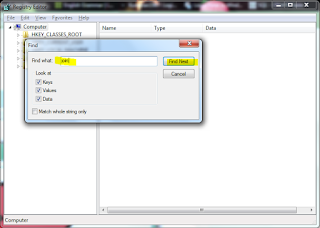
Step 8: Now goto Find.


Step 9: Type program name that you want to remove from registry.

Step 10: Press F3 to search.
Step 11: Once an item is found, read to make sure it is a link to that program.


Step 12: Press delete to remove it.

Step 13: Continue pressing F3 and deleting items pertaining to the program, until all the links are gone.
Saturday, 16 January 2016
Step by step way to turn off Read Receipts notification...
Step 1: Open WhatsApp in your mobile device..

Step 2: Open your WhatsApp setting in your phone...

Step 3: Then you see like this..
 Step 4: Now choose Account option...

 Step5: Now open Privacy option off your WhatsApp..

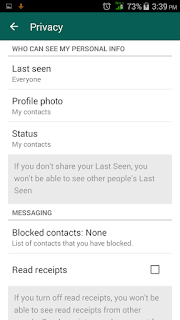
Step 6: Here you see Read Receipts with Checkbox.

Step 7: If that Check Box is Checked, Unchecked that CheckBox.
Now your Read receipts notification is off.
जानिए कैसे बंद करे "Read Receipts-पढ़ें प्राप्तियां" व्हाट्सएप्प में
जानिए "Read Receipts- पढ़ें प्राप्तियां" व्हाट्सएप्प में है क्या ....
संदेश की जानकारी स्क्रीन पर दिखाता है:
- Delivered, जब अपने संदेश आपके प्राप्तकर्ता के फोन भेजा है , लेकिन प्राप्तकर्ता ने अभी तक यह देखा है या नहीं देखा गया है।
- Read or Seen, आपके संदेश पढ़ने के लिए या अपने चित्र, ऑडियो फाइल, या वीडियो देखा गया है । लेकिन आवाज संदेश के लिए, प्राप्तकर्ता को देखा है, लेकिन अभी तक यह सुना नहीं या वीडियो देखा नहीं है।
- Played ऑप्शन , जब प्राप्तकर्ता ने आपका ध्वनि संदेश सुना है।
अपने भेजे गए संदेश के लिए दो नीले जांच के निशान नहीं दिख रहा है उस पक्ष में ये बाते हो सकती हैं ...
- प्राप्तकर्ता अपनी बातचीत खोला नहीं, हो सकता है।
- प्राप्तकर्ता WhatsApp के एक पुराने संस्करण का उपयोग हो सकता है।
- आप या प्राप्तकर्ता कनेक्शन संबंधी समस्याएं हो सकती हैं।
- आप या प्राप्तकर्ता अपनी गोपनीयता सेटिंग्स में पढ़ें प्राप्तियां अक्षम हो सकता है।
पढ़ें प्राप्तियां बंद करने के लिए कैसे करें---------
पढ़ें प्राप्तियां सुविधा से बाहर निकलना करने के लिए,
सेटिंग्स> खाता> गोपनीयता के लिए जाने के लिए और पढ़ें प्राप्तियां अचयनित करें ।
ध्यान रखें : यह आवाज संदेश या समूह चैट के लिए पढ़ें प्राप्तियां अक्षम नहीं करेंगे। इन सुविधाओं के लिए पढ़ें प्राप्तियां बंद करने के लिए कोई रास्ता नहीं है।
How to turn on/off "Read Receipts"...
WhatsApp Read Reciepts....

How can I tell if someone has read my message?
If you see two blue check marks  next to your sent message, then the recipient has read your message. In a group chat or broadcast message, the check marks will turn blue when every participant has read your message.
Message info
For any message that you send, you will be able to see a Message info screen, displaying the details of when your message was delivered, read or played by the recipient(s).
To see the Message info screen:
- Open a chat with a contact or a group.
- Tap and hold on your sent message.
- Tap
 .
.
The Message info screen shows:
- Delivered when your message is delivered to your recipient's phone, but the recipient has not yet seen it.
- Read or Seen when the recipient has read your message or seen your picture, audio file, or video. For a Voice Message, the recipient has seen but has not yet played it.
- Played when the recipient has played your Voice Message.
Please note that when a participant leaves a group, the Message info screen will still show the original information with all participants, including the participant who left the group.
If you do not see two blue check marks next to your sent message
- The recipient may not have opened your conversation.
- The recipient may be using an outdated version of WhatsApp.
- You or the recipient may be experiencing connection issues.
- You or the recipient may have disabled Read Receipts in their privacy settings.
How to turn off Read Receipts
To opt out of the Read Receipts feature, go to Settings > Account > Privacy and uncheck Read Receipts.
Note: This will not disable the Read Receipts for Voice Messages or Group Chats. There is no way to turn off Read Receipts for these features.
How It Works........

WhatsApp Messenger is a cross-platform mobile messaging app which allows you to send and receive messages without having to pay for SMS. WhatsApp Messenger is available for iPhone, BlackBerry, Android, Windows Phone and Nokia and yes, those phones can all message each other! Because WhatsApp Messenger uses the same internet data plan that you use for email and web browsing, there is no cost to message and stay in touch with your friends.
In addition to basic messaging WhatsApp users can create groups, send each other unlimited images, video and audio media messages.

Tuesday, 12 January 2016
Configure how a service is started
Updated: January 12, 2016
Applies To: Windows Server 2003, Windows Server 2003 R2, Windows Server 2003 with SP1, Windows Server 2003 with SP2
To configure how a service is started
- Using Services
- Using the command line
Using Services
- Open Services.
- In the details pane, right-click the service that you want to configure, and then click Properties.
- On the General tab, in Startup type, click Automatic, Manual, or Disabled.
- To specify the user account that the service can use to log on, click the Log On tab, and then do one of the following:
- To specify that the service uses the Local System account, click Local System account.
- To specify that the service uses the Local Service account, click This account, and then type NT AUTHORITY\LocalService.
- To specify that the service uses the Network Service account, click This account, and then type NT AUTHORITY\NetworkService.
- To specify another account, click This account, click Browse, and then specify a user account in the Select User dialog box. When you are finished, click OK.
- Type the password for the user account in Password and in Confirm password, and then click OK. If you select the Local Service account or Network Service account, the password must be blank.
Note
- To open Services, click Start, click Control Panel, double-click Administrative Tools, and then double-click Services.
Note
- To open Services, click Start, click Control Panel, double-click Administrative Tools, and then double-click Services.
Using the command line
- Open Command Prompt.
- Type:
sc configservice namestart= {boot|system|auto|demand|disabled}
- Open Command Prompt.
- Type:
sc configservice namestart= {boot|system|auto|demand|disabled}

Notes
- To open a command prompt, click Start, point to All programs, point to Accessories, and then click Command Prompt.
- To view the complete syntax for this command, at the command prompt, type:
sc config help - For more information about the sc command, see Related topics.
Caution
- Most services are not designed to have the default account changed. Changing the default account of a service could result in the service failing to start.
- Changing the default service settings may prevent key services from running correctly. It is especially important to use caution when changing the Startup type and Log on as settings of services that are configured to start automatically.
- In most cases, it is recommended that you not change the Allow service to interact with desktop setting. If you allow the service to interact with the desktop, any information that the service displays on the desktop will also be displayed on an interactive user's desktop. A malicious user could then take control of the service or attack it from the interactive desktop.
Important
- To improve performance and security in the Windows Server 2003 family, several services have been disabled by default that were previously enabled on Windows 2000. For a table that lists the default settings and provides information about how to enable these services, see Default settings for services. Note that these settings apply only to new installations, not upgrades; all previous service configurations are preserved during upgrades to the Windows Server 2003 family.
- The Local Service account and Network Service account are configured with a null password. Whatever password information you supply is ignored. For more information about service accounts, see Services permissions.
- It is recommended that user accounts that are used to log on as a service have the Password never expires check box selected in their properties dialog box and that they have strong passwords. For more information about creating strong passwords, see Related Topics.
Notes
- To perform this procedure, you must be a member of the Administrators group on the local computer, or you must have been delegated the appropriate authority. If the computer is joined to a domain, members of the Domain Admins group might be able to perform this procedure. As a security best practice, consider using Run as to perform this procedure.
- If account lockout policy is enabled and the account is locked out, the service will not start. For more information about account lockout policy, see Related Topics.
- If you enable or disable a service and you encounter a problem starting the computer, you can start the computer in Safe Mode. In Safe Mode, core services that are required to start the operating system are started in a default scheme, regardless of any changes that are made to the service settings. After the computer is in Safe Mode, you can change the service configuration or restore the default configuration. For more information about startup options, see Related Topics.
- If you specify an account that does not have permission to log on as a service, the Services snap-in automatically grants the appropriate permissions to that account on the computer that you are managing.
- For more information about the user accounts that a service uses to log on, see "Services permissions" in Related Topics. Also, see "Managing System Services" at the Microsoft Windows Resource Kits Web site.
Information about functional differences
- Your server might function differently based on the version and edition of the operating system that is installed, your account permissions, and your menu settings. For more information, see Viewing Help on the Web.
Monday, 4 January 2016
5 WAYS TO GET A GOOD APPRAISAL
Don't forget your achievements
Managers often forget achievements of team members. You shouldn't. Start making a list of what you feel are your accomplishments. Add everything, even the smallest. So when the discussion happens, you know what to highlight.
Don't let the manager forget your achievements
It's not just about remembering your achievements but also making the manager remember them. It won't look nice if you have to remind him/her of how useful you have been when the boss is actually being critical. So make sure he/she is constantly aware of your good work.
Get across the message subtly
To get across the message that you are awesome, you have to build an easy relationship with the boss so that you can casually mention how one of your strategies worked well or how you plan to bring in changes.
Just deliver on expectations
But just tom-tomming your work may not work well if the manager has already formed an opinion about you. You need to break that perception. And the only way is doing something he/she has subtly been asking of you for long and you haven't been able to deliver.
Surprise the boss
This needs hard work. To make the manager really happy, do at least one thing he/she never expected out of you. Pleasantly surprise the boss, with your work results. The boss will always remember that when the two of you sit down for the appraisal meeting.
Subscribe to:
Comments (Atom)